Thinking to transfer a free blog to a self hosted site? If you have been struggling to find a proper post to guide you how to convert your free blog to a self hosted blog then this post is for you.
So, you finally decided to consider self hosted blogging.
First, I must say you are making a wonderful decision and I want to help you with the best of my knowledge.

Many bloggers who use free blogging platforms like Blogger, Tumblr or wordpress.com are clueless about the self-hosted website.
Because, it can take an extra hour to do the settings, and launching your blog.
But, when we look at the advantages of starting a self-hosted blog then all your time and decisions are worth celebrating.
Here’s what we have covered in this post;
1- What is a self hosted site?
2- Why do you need convert a free blog into a self hosted site?
3- How to transfer a free blog to a self hosted site?
Let’s get started.
Quick navigation
What is a self-hosted website?
Self-hosting is when you host a website on private web servers. That means you pay web hosting companies to run and maintain your website on the internet. However, you have the full control and access over all the internet files and database.
If your website has ‘blogspot.com’ or ‘wordpress.com’ in your blog URL then you are not self-hosted. That means you have no ownership and you cannot access the files and other website details.
This blog post contains some affiliate links. That means I make a small commission if you make a purchase at no additional cost to you. I only promote products that I use or wholeheartedly recommend because of their high-quality or great service. Thank you for always supporting my blog!
Why do you need to transfer a free blog into a self-hosted site?
Before we find out how to transfer a free blog to a self hosted site, here’s the why!
Maybe, you already have some reasons to go for self-hosting, but I want to add few points here;
- A free blog limits you in several ways. For example, you cannot use plugins. You can stand out with a premium theme. On free platforms, you cannot monetize your website.
- People don’t consider you professional when you are on the free platform. Don’t take me wrong, but I’m telling you from my own experience. When I used to pitch freelance clients, I linked them to one of my free portfolio websites and mostly, they were not impressed. Then, I started linking this blog and I got an amazing response. Because they knew I was serious with my freelance business and I could actually write posts that engage readers. This is something I have learned from experience. Whatever is your purpose of blogging – your blog should impress every reader, client or brand.
- With a self-hosted website, you are getting prepared for endless opportunities. Not just in sense of making money, but also networking, brand outreach, building expertise and authenticity.
When you are ready to turn your ordinary blog into a profitable business by using different income-generating methods.
Okay,
So, here’s the process.
How to transfer your free blog to a self-hosted site?
This blog transfer consists of four steps;
Step 1 – Buy Bluehost web hosting (includes a free domain) or go to Siteground
Step 2- Install WordPress for free
Step 3- Export your files from the free blog(wordpress.com or blogger)
Step 4 – Import your old files to a new self-hosted site
Coming to the first step…
1- Sign up with Bluehost
Just go to Bluehost website and press ‘get started now’ green button on the screen.
Next, choose the right plan for your website. I will suggest starting with the basic plan because this is what most of the bloggers start with.
With my special link, you can avail a 50% discount and start as low as $3.95/m. For that, you need to buy the 36-month plan which is still affordable than what other companies charge. When you buy the 36-month plan, the deal becomes super affordable.
Also, know that;
- You can always ask for a refund within 30 days if you are unhappy.
- You will no longer be charged for any high prices in the long term.
- This investment will make you committed to your blog, and you take this seriously.
Next step is to choose a new domain name if you don’t already have. When you buy with Bluehost, you get a free domain for one year plus free SSL certificate.
Then, add your account and payment information.
After your payment is made, a confirmation email will be sent to your email id. During that, you can set a strong password to access your WordPress dashboard.
In the next step, you will need to choose a theme(choose any theme as you can change it later) and that’s it. You can also skip this step if you want.
The Bluehost new feature installs your WordPress automatically. Cool, right?
Click this post for detailed step by step tutorial to start a self-hosted site.
Another hosting that I recommend is Siteground
If you want to use Siteground for your blog then I highly recommend going through this step by step post.
Siteground is another fast hosting provider that is trusted by thousands of bloggers, businesses and site owners. You can start your wordpress blog with siteground in just $3.95/m.
Once, you buy your hosting, you can also reach out to Siteground customer support for further guide. They are extremely cooperative.
The first step is to get your hosting.
Now, move to second step.
2- Install WordPress
When you choose Bluehost, WordPress is automatically installed.
So, just skip this step.
3- Export your files from the free blog (wordpress.com or blogger)
First, we will talk about wordpress.com.
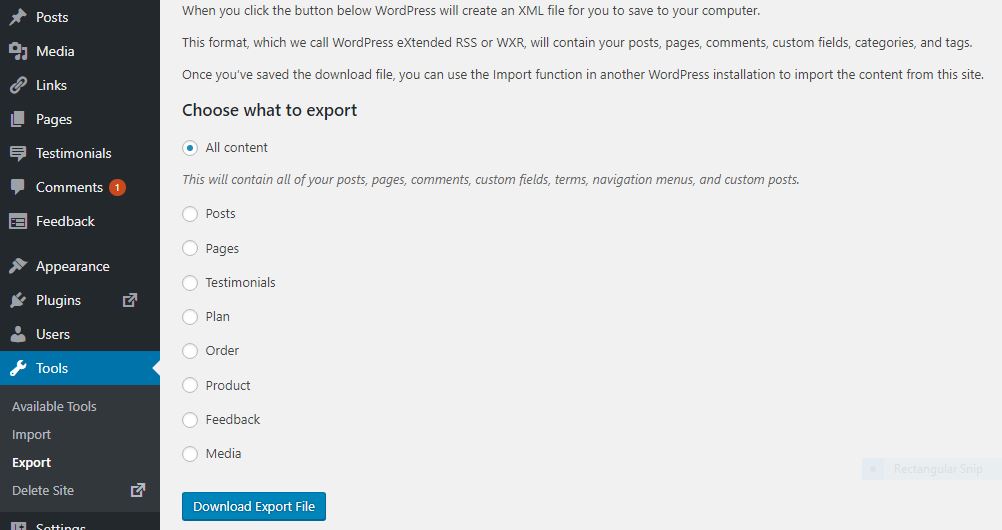
Login to your wordpress.com blog and go to tools → Export.
When you click export —> choose all content —> download export file.
Save this XML file on your desktop or any folder.

Now, how to export files from blogger.
Visit your blogger dashboard, and choose settings. Then, click other.
Now, choose back up content and save the file on your desktop.
4- Import your old files into new self-hosted wordpress.org
Now, visit the new WordPress dashboard you just created with Bluehost.
You can either choose Bluehost for sign in or directly add your blog URL with wp-admin. For example ‘https://yourblogname.com/wpadmin’ and now enter your password.
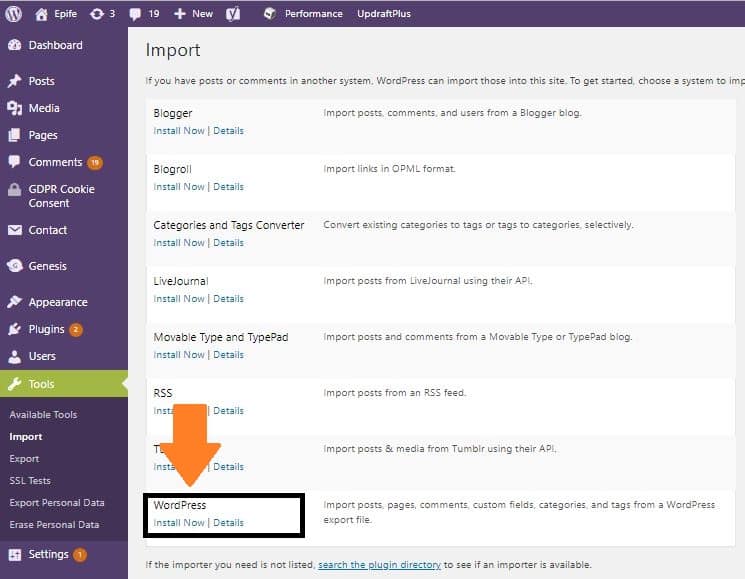
Access to your WordPress dashboard, and go to tools → Import.
Now, choose the option to select Blogger or WordPress and then, add the XML file you have saved on your desktop.

It should take a couple of minutes or longer depending on your file size.
Perfect!
Choosing the right theme!
Free WordPress themes are great to start as a new blogger. Sometimes, these themes are not as responsive and customizable as paid themes are. You should go with free themes if you’re on a tight budget and consider investing in a premium theme later.
My recommendation;
Elegant themes from Divi
Genesis Framework with a child theme (the most powerful theme pro bloggers use and my website is also built on genesis framework)
More affordable theme choices.
And, we have come to the final step.
Setting up redirection: Redirect your old blog to new blog.
Below are a few options you can consider to redirect old blog post links to the new website.
When bloggers think of going self-hosted, the only thing that worries them is their content on the free platform. You can consider any option from the following;
- Delete or stop using the free blog. Focus on the new blog, using the guide above. This option is suitable for bloggers who have recently started a new blog or have less than 10 – 12 posts on their website. It’s okay to leave those posts as it is, and start a brand new blog with more intentional content. Just mention on your new blog that you have moved to a new website.
- If you have massive traffic on your old blog, then redirect your old blog content to the new blog by setting up site redirect that costs $13/year.
- Just Import your old blog files to the new blog and start using new blog links to share with your readers. Be sure to delete your old blog content because Google hates duplicate content.
- Add a new homepage explaining you have moved to a new website or add two lines to all old blog posts with a new blog post link. Time-consuming. But, you can do it slowly.

My choice and extra tips;
First, Add a new post and explain to your readers that you have moved to a new website and mention, it’s ‘mynewblog’. Stick it to your homepage. And, add a banner at the top of your website.
Secondly, go to your old blog posts, and add a small paragraph and insert a new blog post link of that same post. However, it’s good to delete the post content if you have added the exact same post to the new website. You don’t want Google to hate you, right?
Now, anyone who comes to your old blog will find out that you have moved your site to a new domain and your genuine readers will most likely follow you on the new blog. This method is more simple and less complicated. And, it even doesn’t cost you extra money. Just a little time-consuming.
After you have imported old files to the new blog, change all internal links you have added in the old posts and redirect them to new blog URL.
That’s it!
Related posts;
How To Start A Successful Lifestyle Blog
10 Free Blogging Tools Every Blogger Must Use
How To Make First $100 From Blogging?
5 Best Website Hosting For New Bloggers
Are you ready to go self-hosted blogging?
I’m super excited for you.
I hope this guide answers all your questions, and if there is still something you want to ask, just leave a comment.
I will try my best to add to this post and make it even better.

Arfa, for some reason, building your blogging empire on other networks never inspire me and I will perhaps never do it. I have always been a fan of self hosted WP and will remain so for forseeable future. We have all seen what is happening with the Google+ so self hosted is the way to go in my opinion.
Useful article for those who should think about this transfer. Keep it up the good work, cheers. Ahmad
Arfa this is such a helpful guide. I dig it. I started out the right way; on a self-hosted site. Thank goodness I did, avoiding many headaches along the way. Big time shift bloggers either make to succeed, or resist, to fail. Get off free platforms guys.
Thanks, Ryan! When someone goes self-hosted, this opens up a pool of opportunities in terms of collaboration, monetization, and recognition.
Such important reasons, Ahmad! Getting self-hosted is the safer and reliable option to grow yourself online.
Thanks so much for commenting.
Hii Arfa
Earlier I was using WordPress.com for my blog and later I switched to self-hosted. For one thing, you have so much control and you can do so much.
Thank you for explaining everything in such an easy way.
Have a good one:)
Thanks, Bhawna for giving your feedback! I’m sure the self-hosted blog gives you more freedom and control.
Interest points, Arfa. Athough a free WordPress blog or website is cost effective, the disadvantages are enormous, which effectively makes a self-hosted WordPress.org a game changer for bloggers.
You already outlined some of the benefits, so with that in mind I urge newbie bloggers who want to setup blogs and those already using free blogs to make the shift to self-hosted.
Thanks so much, Moss!
A self-hosted blog is definitely a game changer and it provides enormous opportunities for bloggers. Just as you said, it’s time to make the shift.
Been following your blog for while now before going solo online and every of your post has been another step improvement for me. Thanks for this!
Thankyou so much for your effort.